Mastering Open Dental: A Step by Step Guide to Streamlining Your Practice
Mastering Open Dental: A Step by Step Guide to Streamlining Your Practice
Hey dental professionals! 🎉
Are you ready to revolutionize your dental practice with Open Dental? Whether you're a seasoned user or new to the software, I've got you covered with some insider tips to help you streamline your processes and enhance efficiency. Let's dive into the world of Auto Codes and procedure buttons to make your clinical team's workflow smoother than ever!

Why I Decided to Revamp My Open Dental System
I recently purchased a new Open Dental license and decided it was the perfect time to revamp my entire system. Instead of doing this on my own time, I am documenting the process to make it easier for anyone looking to update their own system or understand how it all works.
What Are Auto Codes?
Auto Codes are the secret sauce in Open Dental that tells the software which codes to use for different services. They save time and reduce errors by automating the code selection process based on the number of surfaces and the position of the mouth.
How to Set Up AutoCodes:
Navigate to the Setup Menu: Go to the AutoCodes section in Open Dental.
Customize Your Codes: Open Dental comes with a set of default AutoCodes. You can add or adjust these to suit your needs. For example, for a one-surface anterior composite filling, you'll specify the appropriate code.
Build Out Your Database: Start with the essential codes, like composites and amalgams, and ensure every code is accurate and aligned with your the CDT code and practice's requirements.
Creating Efficient Procedure Buttons
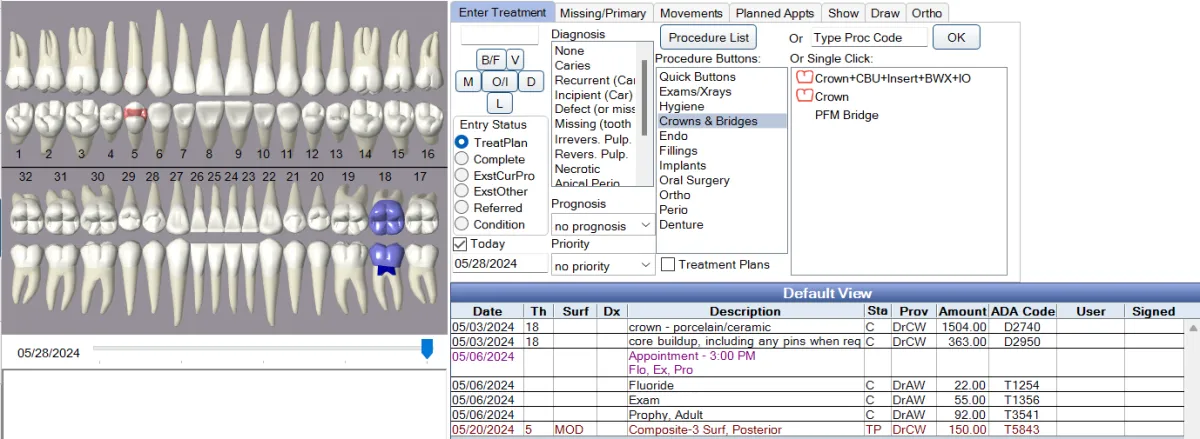
Procedure buttons in Open Dental are a game-changer for speeding up treatment planning and reducing manual entry errors.
Steps to Create Procedure Buttons:
Setup Categories: Go to Setup > Chart > Procedure Buttons. Create categories for different types of procedures like hygiene, crown and bridge, endo, fillings, etc.
Add Common Procedures: Identify the top 100 most billed procedures in your practice and create buttons for them. This ensures quick access and reduces the time spent searching for codes.
Use Auto Codes: Link your procedure buttons with Auto Codes to automate the charting process. For example, if you're frequently billing for PA’s, create a button with the corresponding Auto Code.
Exploding Codes for Multi-Visit Procedures
Explosion codes are perfect for multi-visit treatments like crowns, implants, and dentures. They bundle all the steps into one button click, making treatment planning a breeze.
Creating Explosion Codes:
Bundle Procedures: For a crown, include all related steps like crown buildup, insert, and any necessary x-rays or photos.
Single-Click Planning: Once set up, a single click on the explosion code button will chart all necessary procedures for the multi-visit treatment.
Ensuring Accurate Billing and Treatment Planning
By using Auto Codes, procedure buttons, and explosion codes, you not only streamline your workflow but also improve your revenue cycle. Accurate charting and billing reduce denials and ensure every service is accounted for.
Pro Tip: Regularly run reports to identify the most billed procedures and ensure your buttons and codes are up to date. This not only enhances efficiency but also supports your clinical team in delivering top-notch care without administrative burdens.
Final Thoughts
Updating your Open Dental system with customized AutoCodes, procedure buttons, and explosion codes can significantly improve your practice's efficiency. It reduces the risk of errors, saves time, and ultimately enhances patient care. So take a moment to review your current setup, make the necessary adjustments, and watch your practice run more smoothly than ever.
And hey, if you have any questions or need help with the process, feel free to reach out. I'm here to help you make the most of your Open Dental software!
Until next time, keep smiling and happy charting! 😁
